Sunday, March 13, 2022

Screen Printing T-shirt Designs with Silhouette Cameo Cut Vinyl Stencils

I make a lot of stuff  and I never get around to documenting it. Here are some of them coming at you...in posting dribbles.  

My husband and some friends from work and I went to the Treasures of Ancient Egypt: Sunken Cities exhibition at the Virginia Museum of Fine Art* in January (2021) and one of the objects (Statue of Taweretjust called out to me..."make me into a t-shirt..." So, for our 8th wedding anniversary (bronze) I made my husband that shirt! 

I opened the photo I took of Taweret in photoshop and simplified the design so I could then send it through my cameo silhouette craft machine and cut it out in vinyl to make a screen print template. 

screen printing frame reverse @ hellobella.org
reverse of screen printing frame with vinyl stencil applied. 

Statue of Taweret and photoshop design @ hellobella.org
photo inspiration and final screen print of Taweret

You might notice that I made the figure of Taweret slightly plumper than in the photograph. I thought it would make her more comical (as if it weren't already) but I might revisit her original figure again in the future. We'll see. My husband liked her so much he said I could sell these. 

I used a bronze metallic acrylic paint but the metallic sheen doesn't show as well in photographs. 


This was the first time I have tried screen-printing using cut vinyl and it worked really well.


My husband graduated from Brooks Institute in Santa Barbara, CA. Sadly no longer open. 


For this one I used silver metallic acrylic paint for "Brooks" and titanium white acrylic paint for "Institute". 


Brooks Institute Silhouette Screen Print TShirt


Don't mind his expression. He really does love it. And don't worry, he has more than one plaid shirt. 

Do you watch TV? Of course you do. Do you like Sci Fi? We do. Have you seen The  Expanse? It's very good. I highly recommend it. 


The Expanse screen print tshirt via foobella.blogspot.com

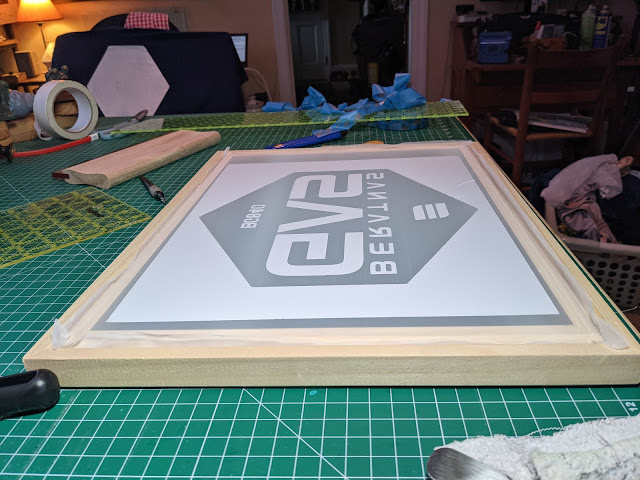
If you watch the show you  might recognize this emblem. This was my first attempt at two color screen printing with the same vinyl template technique. The red ink did not fully cover the white, but it makes it look purposefully worn out. I love it! What do we call that? A Happy Accident? Thanks Bob

The Expanse screen print tshirt via foobella.blogspot.com

I don't have a picture of husband wearing it, but I swear he loves it.  He likes everything I make for him....or he's a very good liar.  

And last (for now) but definitely not least....first, a long explanation....

This one was a labor of love. I had been sketching the idea for this shirt on and off for a while. A long while....

sketches of SYD shirt @ hellobella.org

sketches for SYD t-shirt @ hellobella.org
Finally I came up with the above layout and basic design. Final sketch in red ink. (you never know when or where inspiration hits, or what type of writing implement is around.) I took it into photoshop and removed the color so I could visualize it better.  I also wanted...oh, wait. Maybe I should tell you what is going on here? 

See, my husband loves Pink Floyd, and their original line up included a fella named Syd Barrett. Syd had great talent and creativity, but he also had mental health problems, which eventually led to him leaving the band. He has, to this day, left an indelible mark on the other members of Pink Floyd, as well as their fans. 

The band wrote a song inspired by Syd, Shine On You Crazy Diamond. My design, a diamond incorporating a very stylized song title also included the name, SYD. I don't know if it occurred to the band but I'm staking my claim that "Shine On You Crazy Diamond", broken down to it's major theme "Shine You Diamond", (because he was a diamond before he spiraled) spells SYD, which you can see I have spelled out on the face of the diamond. I wanted this shirt to celebrate not only the song, but also Syd Barrett, and of course, Pink Floyd.  

Whew. that's a lot of thinking for a t-shirt design....

Now, most of the modern world knows this album cover for Pink Floyd's album, Dark Side of the Moon: 


I wanted to incorporate this prism design into my diamond. And below is my final design seen on the computer and cut from vinyl on my Silhouette cutting machine

photoshop design of Shine on you crazy diamond screen-print shirt @ hellobella.org

photoshop design of Shine on you crazy diamond screen-print shirt @ hellobella.org @ www.hellobella.org


Syd Barrett screen printed t-shirt @ hellobella.org

Syd Barrett screen printed t-shirt @ hellobella.org

Syd Barrett screen printed t-shirt @ hellobella.org

Syd Barrett screen printed t-shirt @ hellobella.org

I am not pleased with colors or placement of the rays, and I also want to print it again on a black shirt, which would be more fitting, but blue was all I had at the time. I will rework this in the future...

Also, just for reference, I used all acrylic paints by Liquitex and FolkArt paints. I have since invested in some Speedball screen printing paints. 


Come back for more dribbles of art and stuff.
Thank you for visiting!

*sorry if you wanted to visit this exhibit. We saw it on the last weekend it was in town. 

Monday, January 11, 2021

Animal Crossing: New Horizons Christmas Gifts

Last year, my husband and I started playing Animal Crossing: New Horizons on the Nintendo Switch.  This was influenced by a co-worker of mine, and then our other co-worker joined the fun as well. 

The game is very simple, which is probably why it became a national obsession this year; that and the Covid lockdown with lots of time on everyone's hands. The game is so easy to play that your grandma could do it. Basically, you move onto an Island of your choosing, build your house floor by floor, and fill the island with flowers and trees and residents and homes, and a museum, general store, etc. 

So, for Christmas, it was only fitting to gift my fellow obsessives with AC (Animal Crossing) themed gifts. 


As long as I can remember, my mother has given my siblings and me little Whitman's Samplers for just about every holiday. I always save the boxes with the intent to create little dioramas of them, and this was the perfect occasion.

I had my husband print with his Elegoo Mars 3D resin printer, two beloved characters from Animal Crossing; the sibling owls, Blathers and Celeste. 

Blathers is the Director of the Island Museum and part of your daily tasks is to dig up "fossils" buried throughout the island and donate them to said museum. So, I printed Blathers and one of his fossils and placed them in the museum entrance, where he greets you. 


Celeste, Blather's lil' sis, only shows up randomly on the island, and when she does you might just see shooting stars that night and find "star fragments" on the beach the next day. 


We found the 3D print files for Blathers, Celeste, and the fossil on thingiverse and my husband designed the star fragment, which is now also on available to download on thingiverse. 

For the backgrounds I took pictures of my game screen and then printed them out on shipping label stickers to stick into the boxes. I then used gold rub 'n buff to paint the edges of the boxes for a nice finish.


Thank you for visiting!

🦉🦉

Friday, January 1, 2021

2020 Was A Bummer But A Few Good Things Happened....

We all know what a bad year this was but I was very fortunate to be able to continue working, as was my husband. 

My boss found out in early March that I had a sewing machine and sent me home to sew masks...and there began a love affair.

sewing masks via foobella.blogspot.com

sewing masks via foobella.blogspot.com


I sewed lots and lots of masks for our employees...

sewing masks via foobella.blogspot.com

...and then we were asked to sew masks for the local hospitals. 

sewing masks via foobella.blogspot.com

...and then I just never stopped sewing.  

table runner via foobella.blogspot.com


pillows via foobella.blogspot.com


pillows via foobella.blogspot.com

masks via foobella.blogspot.com

Cafe curtain via foobella.blogspot.com

Curtain Valance via foobella.blogspot.com

cafe curtains via foobella.blogspot.com

pin cushions via foobella.blogspot.com

pin cushions via foobella.blogspot.com


buntings and banners via foobella.blogspot.com

buntings and banners via foobella.blogspot.com

I hope 2021 brings health and healing and a return to normal life for all. 

💛

Thank you for visiting. 


Sunday, August 18, 2019

Foodbella: Clotted Cream. A Poor Name for a Tasty Treat.

This weekend we made some clotted cream. Don't be fooled by that unfortunate--yet technically fitting--name. It's amazing.

I thought the No-Knead Dutch Oven Bread was easy to make, but I don't think anything could be simpler and more satisfying than making clotted cream. See my comments after the recipe.


Clotted Cream
Homemade Clotted Cream Recipe via foobella.blogspot.com

Ingredients:
  • 4 cups Heavy Cream 
Instructions: 
  • Set oven to its lowest temperature. Ours goes as low as 170F.
  • Pour 4 cups of heavy cream into a 9x9 casserole dish.
  • Place the casserole dish on the middle rack and set timer for 12 hours.
  • After 12 hours, remove clotted cream from oven and let cool. 
Homemade Clotted Cream Recipe via foobella.blogspot.com

  • After cooling, about one hour, place plastic wrap over casserole dish and chill in refrigerator about 4-5 hours or until noticeable separation.
  • Remove dish from refrigerator and fold over a corner of the "clotted" cream and pour out the liquid into a container to use as you wish.
Homemade Clotted Cream Recipe via foobella.blogspot.com

Homemade Clotted Cream Recipe via foobella.blogspot.com
left over cream from two batches of clotted cream.
  • Scrape remainder of clotted cream into a butter dish or ramekin large enough to hold about a pint.
  • Now you have wonderful clotted cream, which is traditionally spread over scones and topped with fruit jams or preserves. 
For printer friendly recipe, click here

We watched a few videos about making clotted cream, and they strongly suggested using cream that is NOT ultra-pasteurized. Apparently, it's not supposed to clot as well as the heavy cream made from grass-fed cows, and having a fat content of between 36-40%. Well, that's not to be found at most local grocery stores, so we just bought what was available to us, which is ultra-pasteurized.  When it first came out of the oven after 12 hours, the top layer of the cream looked like a very thin golden gooey cheese, but it was still very liquid underneath. We put it in the fridge and decided to go to Earth Fare to get some of the fancier cream because we were so sure ours would not clot. 

Homemade Clotted Cream Recipe via foobella.blogspot.com
Ultra-pasteurized on the left and pasteurized on the right.
While the fancy heavy cream went in the oven, we took the ULTRA pasteurized cream out of the fridge and to our surprise, it was very nicely clotted! 

So, now we have two batches of clotted cream, and this morning Jason made some blueberry scones with clotted cream.


homemade blueberry scones via foobella.blogspot.com


Homemade Clotted Cream Recipe via foobella.blogspot.com
ultra-pasteurized clotted cream on the left. Fancy pasteurized clotted cream on the right.
Even though the clotted cream made from the Earth fare heavy cream looked slightly better than the ultra-pasteurized heavy cream, they both pretty much tasted the same to me.  I don't know why I was expecting it to have a sweet taste, but in all honesty, clotted cream tastes like unsalted butter, with a slightly nutty flavor and a silky smooth texture. It spreads wonderfully on the warm from the oven scones, and with the addition of some blueberry preserves...heavenly. 


🍴
Thank you for visiting.

Saturday, August 17, 2019

Foodbella: The Easiest No-Knead Dutch Oven Bread

Don't worry. I don't have a long family story about this recipe. I will get straight to it. So easy, and so good. Has become our weekly bread bake. Crispy on the outside and soft and chewy on the inside.


No-Knead Dutch Oven Bread 

PRINTER FRIENDLY
The Easiest No-Knead Dutch Oven Bread via www.foobelladesign.com

Ingredients
3 cups Bread flour (or all purpose)
1/4 tsp instant yeast
1 1/2 tsp salt
1 tsp sugar
12 oz (1 1/2 cups) cool tap water

  • In a large bowl combine flour, yeast , sugar, and salt.
  • Add 12 oz water, and stir with inverted end of wooden spoon until blended. (I promise, this helps it come together more easily). Dough will be shaggy and sticky.
    The Easiest No-Knead Dutch Oven Bread via www.foobelladesign.com
  • Cover bowl tightly with plastic wrap. Let dough rest 8-12 hours, at warm room temperature. We like to put it in our oven with the oven light on (do I have to specify that the OVEN IS OFF? Just making sure). You'll know the dough is ready when its surface is dotted with bubbles.  

                      The Easiest No-Knead Dutch Oven Bread via www.foobelladesign.comThe Easiest No-Knead Dutch Oven Bread via www.foobelladesign.comThe Easiest No-Knead Dutch Oven Bread via www.foobelladesign.com

  • After proofing, scrape the dough from the bowl onto a liberally floured work surface and sprinkle a little more flour over the dough.
  • Using just enough flour to keep dough from sticking to work surface or to your fingers, gently and quickly shape dough into a ball. Do not knead it!
  • Place upturned mixing bowl over the dough to rest while you prep the oven.
  • Place a 6-8 quart heavy covered pot (cast iron, enamel, pyrex or ceramic) into the oven and preheat to 450F.
  • Once oven is preheated, carefully remove the pot from the oven. Remove the lid and turn your dough out into the pot. (Don't worry about the shape, it will be fine). For easier handling of the dough, after proofing you can place the dough on top of floured parchment paper and lift the parchment paper into the baking vessel.
  • Replace the lid and bake for 30 minutes with the lid on.
  • After 30 minutes, remove the lid and bake another 15 minutes until loaf is beautifully browned.
  • Cool on rack.
  • Enjoy!
We've made about 3 loaves and they all look different, with different textures inside and out, but all amazing. 


For a printable PDF link of recipe: click here.

The above instructions are what we followed and worked great for us, but you can find many videos on YouTube with varying instructions. It helps to see how to handle the dough and what it will look like after proofing.  So, here are two that we watched. 


The below video is in French with subtitles, but it's the first video we saw and the closest recipe we followed. Though, at the end, we did not want our bread to be soft on the outside, so we did not put it in a bag as he did. Otherwise, it's so easy.


Thanks for visiting, and let me know if you make this recipe. 
🍞
Enjoy!